Saturday, September 12, 2015

Home remedies for Acidity

>Banana
How do they help?
  • They are a rich source of potassium and help keep the level of acid production in your stomach in check.
  • Certain components in the fruit also help increase the production of mucous in your stomach, which helps protect it from the harmful effects of excessive acid production.
  • Are high in fibre content which helps speed up digestion, preventing the recurrence of acidity. ]
Tip for relief
Eat a ripe banana for some relief. You could also eat an overripe banana to beat an especially bad bout of acidity, as they tend to contain more potassium which makes it the perfect antidote. 
> Tulsi
How does it help?
  • Tulsi leaves help stimulate your stomach to produce more mucous
  • Has antiulcer properties and reduces the effect of gastric acids,
Tip for relief
Chewing on five to six tulsi leaves when you suffer from acidity is a great way to beat the discomfort you feel.
 > Cold milk
How does it help?
  • Milk has a high amount of calcium that helps it prevent acid build up and absorbs the excess acid produced, thereby reducing the symptoms of acidity.
  • The fact that it is cold also provides instant relief from the burning sensation one feels during acid reflux.
Tip for relief
It is essential that you have the milk cold and without any additives like sugar. You could even mix it with a spoon of ghee to make the remedy even more effective. 
> Saunf or aniseed 
How does it help?
  • Has very potent anti-ulcer properties (due to the volatile oils it contains)
  • Aids in digestion and relieves constipation.
  • Helps cool the lining of the stomach, reducing that burning sensation you feel during a bout of acidity.
Tip for relief
While simply chewing on a few saunf seeds can help reduce the symptoms of acidity, as a long term remedy, boil a few seeds in water and leave overnight, drink this water during the day when you feel uneasy.
> Jeera
How it helps
  • It has properties that stimulate the production of saliva which helps in better digestion, improves metabolism and relieves gas and other gastric troubles.
  •  According to Ayurvedic doctors jeera has a calming effect on irritated stomach nerves and helps heal ulcers.
Tip for relief
You can chew a few seeds of jeera to relieve acidity or boil it in water and drink the solution when it has cooled down
> Clove
How it helps
  • When bitten into your taste buds react cloves pungent taste and secrete excess saliva, which in turn aids digestion and beats the symptoms of acidity.
  • Has carmitive properties and helps improve peristalisis (the movement of food down the stomach).
Tip for relief
In case you’re suffering from acidity, bite a clove once so that the juice is released and then keep it in the mouth. The slowly released juice will immediately lower acid reflux and give you some relief. Cloves can also help relieve a sore throat.
> Elaichi
How it helps
  • Known to balances all three doshas – kaphapitta and vataaccording to Ayurvedic texts, elaichi is known to stimulate digestion and relieve stomach spasms.
  • It also soothes the inner lining of the stomach helping it ward off the effects of excess acid produced in the stomach.
Tip for relief
To relieve acidity crush two pods of cardamom (with or without the skin), boil the powder in water and drink the cooled juice for instant relief.
> Mint Leaves
How it helps
  • Pudina helpslower the acid content of the stomach and improves digestion.
  • Has a cooling effect which helps reduce the pain and burning associated with acid reflux.
Tip for relief
If you feel an attack coming on chop some mint leaves, add them to a pot of boiling water and drink this water after it cools. 
> Ginger
How it helps
  • The root is known to improve digestion and aid in better absorption and assimilation of essential nutrients.
  • It also protect your stomach against ulcers by promoting mucus secretion and reducing the effect of the acid on your stomach.
Tip for relief
For relief from acidity, chew a small piece of ginger. If you find that too pungent, try boiling it in water and drinking the decoction. Another remedy is to crush ginger, mix it with a small piece of jaggery and keeping sucking on it allowing the juice to slowly reach the stomach.
> Amla
How it helps
  • Amla is a kapha and pitta pacifier apart from having high amounts of vitamin C that helps in healing the injured stomach lining and oesophagus.
Tip for relief
Have one teaspoon of amla powder twice a day to help keep acidity at bay.
So the next time you feel like you might suffer from a bout of acidity, ditch that bottle of antacid, and try some effective home remedies instead, after all they’ve been around for centuries.

Homemade remedies for constipation

> Lemon

Lemons, or more specifically the juice from lemons, can treat constipation as it stimulates the digestive system and gets things moving . This is one of the simplest and most effective treatments that you can try at home.
  1. Extract the juice of half a lemon and add it to a glass of warm water. You can also add a pinch of rock salt or one-half teaspoon of table salt and a little honey to it.
  2. Drink the lemon water first thing in the morning on an empty stomach. You can also drink a glass of this solution in the evening.
  3. Follow this remedy daily and expect results within a few days.

> Fennel

Fennel seeds are useful in treating issues like indigestion, bloating, constipation and irritable bowel syndrome as they encourage smooth muscle movement in the digestive tract.
  1. Take one cup of fennel seeds and dry roast them.
  2. Then, grind them and sieve the mixture.
  3. Store this tasty and digestive powder in a jar.
  4. Take half a teaspoon of this powder daily with warm water.

> Figs

Figs are very high in fiber and act as a natural laxative. Those suffering from chronic constipation should include figs in their diet. For the treatment of constipation, both fresh and dried figs can be used. When fresh figs are available, eat them with their skin on. The skin contains most of the fiber and calcium.
  1. Take two to three almonds and dried figs.
  2. Soak them in water for a few hours.
  3. Peel the almonds and grind the ingredients.
  4. Take this paste with one tablespoon of honey at night.

> Castor Oil

Being a stimulant laxative, castor oil stimulates the small and large intestines and improves the bowel movement. Simply swallow one to two teaspoons of castor oil on an empty stomach. To improve the taste, you can take it with a fruit juice.
Within a few hours, you will notice a huge improvement in your condition. You must not repeat this remedy for a prolonged period as it can cause side effects.

> Honey

Honey is highly beneficial in relieving constipation as it acts as a mild laxative. You can have it daily to prevent as well as treat constipation.
  • Consume two teaspoons of honey three times a day.
  • You can also mix one tablespoon each of honey and lemon juice in a glass of warm water. Drink it every morning on an empty stomach.

> Flax Seed

Flax seed has many medicinal properties along with tons of fiber and omega-3 fatty acids. Also, flax seed has a laxative property, which can be very useful in curing mild to very serious cases of constipation.

  • Mix one tablespoon of flax seed in a glass of water and allow it to rest for two to three hours. Drink the water daily before going to bed. In the morning, your bowel movement will be much better.
  • Alternatively, you can simply eat two to three tablespoons of ground flax seed with a glass of water.

Yoga for glowing skin

yonimudraYoni Mudra – Detachment from chaos:
  • Sit cross legged in Sukhasana - the easy pose
  • Place your thumbs on your ears and index figures on you closed lashes
  • Now put your middle fingers on your nostrils, the ring fingers above your upper lips and little fingers below your lower lips
  • Ensure that your elbows are parallel to the ground
  • Concentrate on your breath while in this mudra
  • Stay in the mudra for 5 to 10 mins
Note: You don’t need to apply pressure with your fingers. 
yoga2Yog Mudra – The Yoga Pose:
Method:
  • Sit in Sukhasna 
  • Hold your left wrist with your right hand at the back
  • Inhaling pull your shoulders behind and expand your chest
  • Exhaling bend forward and touch your right forehead to your right knee
  • Inhaling return to the starting position
  • Repeat the steps and touch your forehead to left knee and then in the middle.
Repetitions: 2 rounds
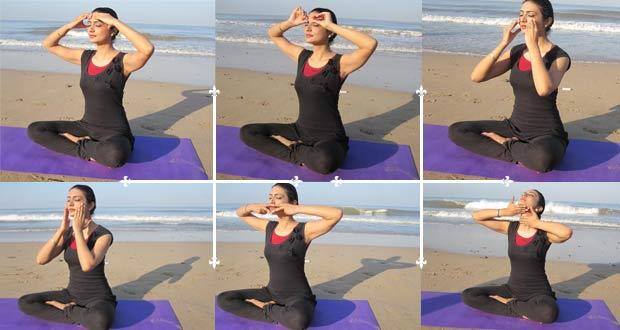
yoga3Kapal randhra dhouti – Yogic Facial Massage:
This is the Yoga Institute’s signature yogic facial massage. It is an excellent technique that will make you want to forget your expensive skin treatments. It stimulates all your facial nerves and over time gives a natural, beautiful glow. It also help you relax and de-stress.
Method:
  • Gently but firmly massage your forehead with your fingers starting from the centre of your forehead till the temples
  • Gently pinch your eyebrows along the length. Repeat this three – four times
  • Massage the around your eyes in circular motion
  • In outward strokes massage your checks
  • Look up and massage your neck in upward strokes
Note: You don’t need to use oil or cream for this technique.  A gentle massage with your fingers will be sufficient. 
kapalbhatiKapalbhati – Breathing Technique:
Method:
  • Take a deep breath.
  • Forcefully exhale through your nose rhythmically.
Note:
Please keep in mind that kapalbhati is different from stomach pumps. So, focus on exhale through your nose and not on the movement of your stomach. 
Asanas:
Standing chakrasana – The wheel pose:
Method:
  • Stand erect with your feet apart and parallel. Interlock your hands in the front.
  • Inhaling raise your hands up and bend backwards
  • Exhaling bend forward and swing your arms behind. Interlock your fingers at the back and pull towards your head
  • Inhaling return to the starting position. 
Repetitions: 3
dhanurvakrasanaDhanurvakrasana – The bow pose:
Method:
  • Lie down flat on your stomach with legs stretched out and arms by your side
  • Bend your legs and catch your ankles. Simultaneously, pull your ankles and raise your legs.
  • Inhaling, raise your head and neck upward. Hold the position
  • Exhaling, return to the starting position. .
Repetition: 3 rounds
paschimottanasanPaschimottanasana – The seated forward bend pose:
Method:
  • Sit on the floor and inhaling stretch your legs in front of you.
  • Keep your knees firm and ensure that you don’t bend them while doing the asana
  • Exhaling bend forward, hold your toes and try to touch your forehead to your knees
  • Maintain the pose for 10 seconds
  • Inhaling return to the starting position. 
Repetitions: 3 rounds

Yoga Poses To Help Alleviate Anxiety

Child's Pose is commonly known as a place of rest in yoga. Most people use it to relax and regroup in between more challenging asanas during class. I've found a lot of comfort in utilizing it to help ease my anxiety symptoms.
Child's Pose helps to release tension in the back, neck and shoulders, which are areas where most people hold a lot of their stress. This pose also helps to promote relaxation by encouraging steady conscious breathing, which is particularly great for anxiety sufferers due to a calming of the nervous system.
Begin on your hands and knees with your big toes touching. Your hands should be directly under your arms and your legs hips distance apart. Exhale as you bow forward allowing your torso to rest on or between your thighs with your forehead on the mat. Keeping your arms long and extended, press into your hands keeping your sit bones on your heels.
Hold this pose for as long as you need to. When finished, slowly use your hands to walk your torso upright and sit back on your heels.
Tree Pose is fundamental in easing anxiety. By implementing basic standing balances, you promote concentration, focus and awareness, with the intention of taking your mind away from anxiety and placing your attention on your physical self.
When not in a yoga class, I often practice Tree Pose whenever I find myself standing for an extended period of time, like while waiting for the train or standing in line at the grocery store. It's a great distraction from some of my most common anxiety triggers.
Standing tall with your feet hips-width distance apart, shift your weight to your right leg. Bend your left knee, and place the sole of your left foot into your inner right thigh or just below the knee, with your toes pointing toward the floor. Center your pelvis so that it is directly over your right foot. Press the sole of the left foot into your inner right thigh, while resisting with your outer right thigh. Place your hands into prayer with your thumbs at your heart center. Your gaze can be facing the ceiling or facing forward. Hold for 2-3 breaths, then repeat on the other side.
If you are sufficient with standing leg balances and would like a pose that strengthens, lengthens and challenges you, Warrior III is the way to go. This pose enhances core strength, improves coordination, balance and posture. It also stimulates your abdominal region, which helps to improve digestion. Proper digestion and overall gut health is imperative in the fight against anxiety, as recent studies have discovered a link between the two.
Warrior III will also help to calm the mind by shifting your attention away from intrinsic thoughts and redirects your thinking back to yourself.
With your feet hips distance apart, turn to the left and widen your stance about four feet apart. Turn your right foot about 90 degrees so your toes point toward the front of the mat. Shift your left foot about 45 degrees so that its at an angle toward to upper left side of the mat. Align your pelvis and torso with your right foot and bend your right knee, keeping both feet planted on the mat.
Raise your arms overhead and press your weight onto your right foot, lifting your left leg as you lower your torso forward, making your body parallel to the ground. Reach out through the heel of your left foot, keeping both legs actively engaged. Your arms will now be reaching forward. Straighten your right leg and shift your gaze toward the ground a few feet in front of you and hold for 2-3 breaths. Slowly lower your leg back to the floor and repeat on the other side.
Headstand is one of my favorite poses to practice, especially during my most anxious times. It reverses the blood flow in your body, causing you to focus more attention on your breath, rather than your anxiety or discomfort. By focusing your awareness on your body's place in space, you begin to evoke calmness and contentment.
When we increase and stimulate blood flow to our head, one main benefit is the detoxification of our adrenals, which is known to contribute to a decrease in depression as well.
Start on your hands and knees, with your forearms shoulder-width apart. Keeping your elbows there, interlace your fingers so that your pinkies touch the ground. Place the crown of your head onto the ground and cradle it in your hands. Tuck your toes and lift your hips high, walking your feet in as closer to your elbows. Engage your abdominal muscles, press your forearms onto the mat lifting out of your shoulders and slowly lifting one leg off the ground. You can practice lifting one leg and then the other until you feel steady.
To enter full headstand, lift your feet straight up over your shoulders and hips until your legs are completely straight overhead. You can practice near a wall to support you if you're new to headstand. Keep your gaze fixed and old for 5-6 breaths (or longer if you desire).
When you're ready, lower your feet down one at a time and bring your knees to the mat. Rest in Child's Pose for 3 breaths.
If you've ever taken a restorative yoga class, I'm sure you're very familiar with this pose. Legs Up The Wall is great for relieving lower back pain and easing anxiety symptoms, in addition to relieving arthritis discomfort, menstrual cramping, reducing insomnia and lowering high blood pressure.
This pose can be performed anywhere a wall is present, however I strongly recommend finding a place of comfort, silence and serenity to really enjoy the full benefits. You can place a pillow or blanket under your lumbar spine to relieve any lower back pressure as well.
Roll up your yoga mat about halfway and rest it directly at the wall. Sit with your left or right side resting as close to the wall as possible, just outside your mat. In one steady movement, swing your legs up onto the wall and rest your shoulders and head onto your mat. Slowly ease yourself forward until your buttocks and hamstring area touch the wall. Allow yourself to close your eyes and relax. Stay in this pose for 10 minutes or longer if needed. When you're ready to come out, swing your legs to the left or right of your body.

Exercises for weight loss


1. Push-Ups:

Triceps-pushupsPush-up is a basic exercise that is done by simply raising and lowering the body with the support of the arms.  Triceps pushups are done by placing your hands on the floor right below your shoulders, while holding your body straight.  Now lower your chest by bending your elbows and pushing back into the initial position. If you feel this exercise difficult, you can make it easier by placing your knees on the floor. This exercise trains the muscles of chest, shoulders and arms.

2. Bridge:

BridgeBridge exercise usually strengthens the whole abdominal region, hamstrings, the lower back and the glutes. It is considered as the basic rehab exercise that improves spinal stabilization. Lie down on your back by putting your arms by your sides. Now bend your knees and raise your hips while maintain your back straight and keeping your feet on the floor. Let the hips be in a straight line with your shoulders and knees. Hold it there for 30 seconds and gently lower your hips back to the initial position and repeat the same for several minutes.

3. Leaps:

Skaters LeapsLeaps / skaters are leg strengthening exercises. This is a great exercise for sports persons, which improve speed and grace. In order to do perfect leaps, get into a semi-squat position and jump sideways and then land on your right foot. Repeat the same process in the opposite direction, now land on your left foot. You can perform these leaps regularly to strengthen your legs.
4. Plank Crawl:
Plank CrawlOne of the best plank variations involves crawling. This exercise routine helps you tone your abs, back, and shoulders. Crawls are designed to use the upper and lower body in unison. To do a plank crawl you need to get in a pushup position, then lowering yourself down into the plank position by balancing on your forearms, elbows and toes. Now balance on one arm the come back to your initial push-up position, repeat the process by alternating the arm. You have to maintain a straight body during the exercise routine. Plank is commonly practiced in Pilates and yoga. You can decrease the difficulty level by lowering your knees to the floor.

5. Squats:

Squat-EXSquats are really great exercises for your buttocks and legs. Squat is a position in which you couch or sit with knees bent close to the heels with your thighs parallel to the floor. It is a full body work out that primarily targets hips, thighs and buttocks. If you find this exercise routine difficult then try the same sitting on a chair and standing up, now repeat this process a number of times to tone your body and provide some benefit to it.

6. Walking Lunges:

Walking LungeWalking Lunges are very high intensity exercises that help in strengthening thighs and hips. Stand tall with your feet shoulder-width apart. Now step forward with your right foot the land on your left knee and then on forefoot. Make sure that you keep your knees at 90 degrees approximately. Stand on forward leg with the help of rear leg. Alter the leg and repeat it again. This exercise can be done by holding a pair of dumbbells in both your hands.

7. Single Leg Balance:

Single Leg Balance StickThis is one of the hardcore exercises that targets leg power. The first thing you need to do in this exercise is to balance on your left leg and lean forward at the waist by keeping your body straight. Now extend your right leg towards the ceiling. You should maintain a slight bend in your left knee. Then raise your upper body to the initial position. Repeat it a few times for a better workout. If you found this balancing difficult, hold your back leg for support initially.

8. Superman Back Extension:

Superman-Plank-hotelThis exercise will help you increase the strength of the muscles along the lower back and gluteus.  In order to perform this exercise, Lie on your stomach and gently raise your legs and upper body at the same time. Always keep your head straight in this position. Hold it there for 2 – 3 seconds and repeat it for 10 – 12 times daily to increase your leg power.

9. Bird Dog:

Bird DogBird-dog is an excellent exercise to stabilize the lower back (spine) during extremity movement. It works on abs, back, hips and butt. Begin with a hands and knees position (downward dog) with your fingers pointing forward. Make sure that your hands are under your shoulders and knees are under your hips. Slowly stretch your opposite leg and arm almost parallel to the floor. Hold your balance for a few seconds without arching or sagging your back. Return to the initial position slowly and repeat the same alternating sides.

10. Side Plank Hip Drops:

Side Plank Hip Drops1Side plank is the best exercise that helps you build core strength. This exercise primarily targets on arms, legs and back. Begin this exercise routine by lying on one side with your elbow lined directly under your shoulder. Lift your hips off the floor by supporting your body with your forearm and keeping your feet stacked on top of one another on the floor. Hold your torso steady for 3 -5 seconds and then slowly lower your hips onto the floor repeat the same process by switching sides.